Sunday, November 25, 2012

How to show Hidden files and folders in Windows

How to show Hidden files and folders in Windows 7. Method also works in Windows XP and Vista.

Method 1

Show hidden files and folders using Folder Options.

  1. Click on Start Button. Type "Folder options" and open it. Or you can open windows explorer and click on organize (top left) and click folder options.
  2. A folder options window opens.
  3. Click on the view tab.
  4. Change from "Don't show hidden files" to "Show hidden files".
  5. Click on Apply and OK.


Method 2

Show hidden files and folders using Registry editor.

  1. Open registry editor by clicking Start Button and type "regedit".
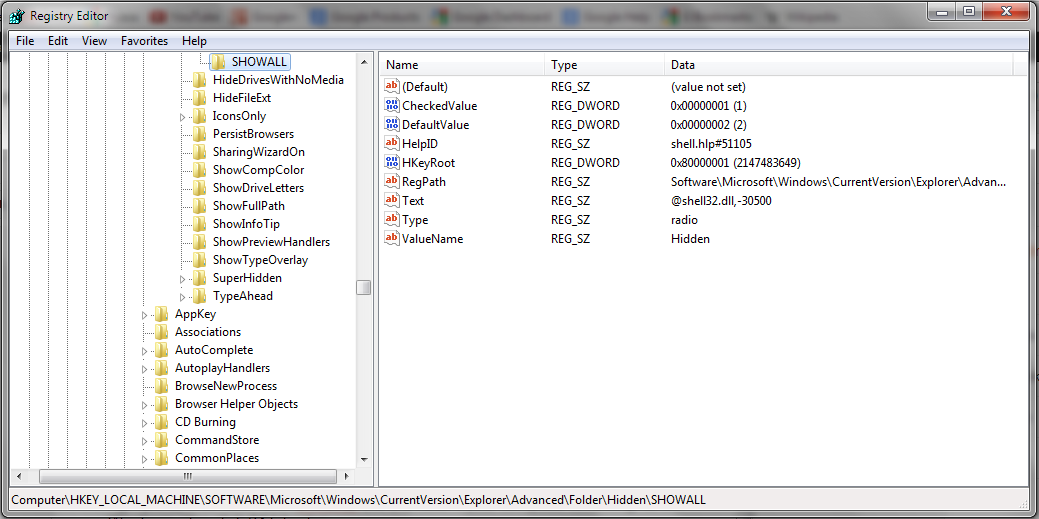
  2. Locate the following registry:Computer\HKEY_LOCAL_MACHINE\Software\Microsoft\Windows\CurrentVersion\Explorer\Advanced\Folder\Hidden\SHOWALL
  3. Click SHOWALL folder in the left pane and check if item CheckedValue is present in the right pane and if the value set to it is 1.
  4. If CheckedValue item is missing in the right pane, then right click in the blank area on the right pane, click New -click DWORD (32 bit) value if your computer is running 32 bit Windows, else click 64 bit value.
  5. Name the item you created as CheckedValue.
  6. Double click on CheckedValue item and type 1 in the value data box and then click ok.
  7. Close the registry editor and restart the computer.
  8. Enable hidden files and folders to see if it works.
[Click to view full size]


Save your data with cloud computing


Surpassing earthly boundaries, digital data storage has set up shop in the firmament. “The Cloud” is an increasingly popular term for remote data centers, usually with astronomical storage capacity, which people can access via the Internet using their various devices. 

Attempting to mimic the convenience of cloud computing, new technology allows people to set up a “personal cloud” on their home networks. Let’s backtrack and first take a moment to talk about the “public” cloud.


The Public Cloud


The cloud refers to anything from Dropbox, a storage space for personal files, to Netflix, a reservoir of movies and TV shows people can stream to their computers, tablets and phones. Internet giants like Google, Apple and Facebook all offer various forms of cloud services, which is often referred to as third-party data storage because the company that is hosting the data is separate from the entity that owns the data and the entity accessing it.

Based on private analysis, Gartner Inc., a technology research firm, believes cloud computing will continue to grow precipitously going forward.

“The reign of the personal computer as the sole corporate access device is coming to a close, and by 2014, the personal cloud will replace the personal computer at the center of users’ digital life,” the report concluded.

The popularity of the cloud stems from convenience and reliability. Conveniently, one can access his or her files anywhere the Internet is available. In addition, the cloud is reliable as a way to back up data. With traditional storage methods such as on a home computer or external hard drive, there is a risk of hardware failure, like when your computer breaks or you drop your external hard drive or iPod. As you might imagine, a cloud is significantly more difficult to destroy, and it’s a safe place for your data. 

The Personal Cloud 


Sharing is at the heart of cloud computing. Cloud services provide smart and easy-to-use channels to selectively make files available to friends, family and colleagues.

The personal cloud, like its public counterpart, can be a great tool for families. It is a convenient way to have a centralized location for pictures, videos and songs, stored right in your own home. Also, it allows for the peace of mind of having data automatically backed up in a safe, secure and nearby location, without having to wonder whether or not third parties have access to your private and personal information.

On the downside, security and privacy are serious concerns many have with sending data into the digital stratosphere. What are those companies doing with all that data you are sending to them anyway? Maybe they are using the information to build a marketing profile that they will turn around and sell to advertising companies.

Enter the personal cloud, a piece of hardware that works with your wireless router. When configured, the device automatically saves data from home computers, tablets, phones and game consoles onto a localized cloud. The data can be accessed by any device within the wireless network — like your smartphone, tablet and laptop.

When it comes to digital data storage, unlike weather, a cloudy horizon may not be foreboding. Thanks to the convenience of cloud computing, the days of toting around disks and drives (both floppy and hard) will soon be as out-of-date as yesterday’s iPhone.

Saturday, November 17, 2012

How to recover data from a crashed Windows system


[This article was also posted on our sister website: Tech Authority]

How to recover your data from a crashed Windows 7 computer? (Will work on vista and XP too) 

An easy way to recover data is to install another Operating system so that it can help you to access your hard drive. We'll choose Linux as it is free. 
To install linux on your computer, you'll need a linux distribution (distro). 99% of them are free. Search for list of linux distributions on Wikipedia. You'll find a list of lot of linux based operating systems. livecdlist.com can also help. 
I'll recommend ubuntu, tiny linux, knoppix, fedora, debian, xubuntu, px linux os etc. Download any of 'em and make a bootable usb. Bootable usb can be made using unetbootin, universal usb installer etc. (search for live cd maker). Install this and make a bootable pen-drive (I recommend 4gb). 
Now turn off your computer and restart. As it starts, u'll see boot options (F12 or something else). Press it and u'll see a black window showing boot options. Choose your pen drive to boot and then hit enter. After booting u'll see a menu provided by that linux distro. choose live cd or try.
Then you'll see ur new OS which is running from ur usb. Now u can access ur hard drive. Connect an external/portable hard drive and then copy all of the data. After it, shut down ur computer; all of the data has been backed up. Now go on and format ur hard drive by using windows 7 (or other Windows) installer DVD/ USB.


Friday, November 16, 2012

Which one is better: Blogger v/s WordPress


There are many free blogging platforms but only two have won every one’s heart. Yes you got it right: Blogger and Wordpress. These are the best and popular blogging platforms today. Although there are a lot other blog hosting services but these are the choice of most of the people. Freshers who want to start their blog (and sites too) stay confused among these that which platform they should choose and why. So here’s a comparison between two.


Blogger is free blogging platform owned by Google. So Google’s policies are applied to Blogger. It’s totally free. It is very easy to use and maintain. If you are done with setting your blogger account you can start posting immediately. You can also use your own custom domain with it. The blog is hosted on domain blogname.blogspot.com . You can have your own domain name by paying $10 USD per year.

Features of Blogger

  • It is very easy to setup and maintain blogger account.
  • It needs Google ID to sign up and hence you get one more product added in your Google products list. It also connects with Google+ so you can post directly to your Google+ profile or page.
  • It has built in social connectivity features.
  • You can earn money using Blogger. It supports ad programs from Google Ads, Amazon etc. so you can earn money while sitting at home, without spending a single dollar.
  • Because it is a Google product, so it has a special feature which every blogger/ site owner wants i.e. SEO (Search Engine Optimization). Your blog is listed in top of the Google results (not always, but most of the times and you can enhance with Adwords).
  •  It has its own URL set as blogname.blogspot.com. You can buy your own custom domain name or move your blog to a URL which you have bought.
  • It offers gadgets, so you can make your blog look nice and turn into professional website. It has a lot of themes which also help you to organize your blog.
  • You don’t need to be a coding expert. Its interface is too good so you can easily understand every part of it. If you are a developer, then it’s also good, because you can customize your whole blog. Blogger gives you the code of the entire blog.


Now let’s talk about another great platform, Wordpress. Wordpress has two versions:

  1. Wordpress.
  2. Wordpress.com

WordpressWordPress is a free and open source blogging tool and a content management system (CMS). Anyone can download WordPress software from WordPress.org and install on their website for FREE. It provides tool for web development, but does not provide the hosting options, so you have to choose a hosting company to host your blog/site (It’s not difficult).

Wordpress.com: WordPress.com is a blog hosting service provider, powered by Wordpress. It provides hosting option so you can have a free hosted blog on web as in blogger. It offers a free version with limited features as well as a paid version with premium features. Wordpress.com is developed by same team who developed Wordpress.

Features of WordPress

  • Wordpress provides you an open source tool for designing your website. It means you can customize your site in any way you want. You own it on your server so you have full control over it. 
  • You can design an offline website using wordpress, and can view in your browser too. If you want to make it available on web, you can upload it to your URL or you can host it you using some hosting company.
  • Wordpress provides a lot of themes from its base. More than thousands of themes are available via third parties.
  • There are tons of themes and plugins available on web for Wordpress which make your blog/ website look beautiful. Installation of plugin requires a single click. It’s that much easy to add and use a plugin and you can uninstall them whenever you want to.
  • You can also integrate adsense account with your wordpress site after activation from Google. If your blog is powered with wordpress then you can customize it in a better way and make it search engine friendly.
  • Wordpress.com does not have as much themes as wordpress has, but it has hosting options. Your site is available at a domain sitename.wordpress.com and you can buy it anytime.
Now it’s your turn to decide best for you. First think about the purpose for which you want to blog and start a website then choose a platform.

If you’re going to make a professional site or blog than we recommend you to use WordPress.org And if you just starting blogging and don’t want to spend money, than Blogger is good choice for you.

Tuesday, November 13, 2012

How to root your Android


What is rooting the Android?


Android rooting is the process of allowing users of devices running the Android mobile 
operating system to attain privileged control (known as "root access") within Android's subsystem.Android is based on Linux. 

On Linux and other UNIX-like operating systems, the root user is equivalent to the Administrator user on Windows. The root user has access to the entire operating system and can do anything. By default, you don’t have root access to your Android device, and certain apps won’t function without root access.

With root access, you can disable the bloatware that comes with your phone, manually deny app permissions, run a firewall, access the entire file system, or tether your device, even if tethering functionality has been disabled. You’ll find many apps that require root access in the Google Play store (formerly known as the Android Market), although they won’t function until you root your device.


Warnings

Before you root your Android phone or tablet, there are a few things you should be aware of:

  • Warranty – Some manufacturers assert that rooting voids your device’s warranty. However, rooting will not actually damage your hardware. You can “unroot” your device and manufacturers won’t be able to tell if it’s been rooted.
  • Security – Google Wallet, in particular, has a vulnerability on rooted devices that could allow other apps to access your PIN and other wallet information.  Google Wallet displays a warning message if you run it on a rooted device. If you’re one of the few people using Google Wallet for NFC payments, you may want to reconsider rooting your device.
  • Bricking – Rooting a device is a very safe process. However, there’s always some danger of “bricking” a device when you go outside the normal parameters and hack around with it — particularly if you’re trying to root a device or operating system version not supported by a tool. “Bricking” means to breaking the device, making it about as useful as a brick. When you root, jailbreak, or install a custom ROM, or otherwise hack around, you do so at your own risk. It’s a good idea to do a little bit of research first and see if other people report success rooting your device.

Disclaimer: Rooting your device will void its warranty. In addition, performing the rooting procedure incorrectly may have unexpected consequences. Please follow this guide at your own risk. AddictiveTips will not be liable if your device gets damaged or bricked during the process.

Setup
Here we will use SuperOneClick for root process.
Download here: SuperOneClick
The actual rooting process itself should only take a single click. However, you’ll need to do a few quick things first:
Download and install the Java JDK and Android SDK on your computer before continuing. Java must be installed before the Android SDK.
Enable USB debugging on your Android. On the device, go into the Settings screen, tap Applications, tap Development, and enable the USB debugging check box.
Connect your Android to your computer using its included USB cable. Don’t mount the device’s SD card on your computer – just plug it in.
You’ll also need the USB drivers for your phone or tablet installed. SuperOneClick itself should be able to automatically install the appropriate drivers – however, if this fails, you’ll need to download and install the appropriate drivers from the device manufacturer’s website.
Start here
1. Now you have downloaded and installed SuperOneClick. Open it.

2. Click the Root button in the SuperOneClick window and SuperOneClick should do the rest.


3. The process will take a few minutes. If you run into a problem, you might want to check the XDA Developers forum for your device or do a Google search. 


Once you have completed above process, restart your device after rooting it. You will see the Super User Icon and it means that you have successfully rooted your phone. Keep in mind that on using this method to root Android device will also help you to unroot it, but you can't root it again.


Rooted Android Screen


Super User logo


So, the above GUI based method was pretty simple. Here's another method which is console based and bit typical.


[Courtesy: How to Geek]

How to Save Email attachments to Google Drive


Now you do not need to worry about your email attachments if your system gets crashed. Because a Google Chrome extension "Attachments.me" helps you to save it to your Google Drive directly. The most cool thing is that it works automatically, so there's no need to manually move every attachment there. 

It is easy to set up the app. When you're done, the attachments from the upcoming E-mails will move to your Google Drive. Keep in mind that it will also fill your Google Drive storage. 

Download app here


Do you like it? Put your views in comments. 


Screenshots


Monday, November 12, 2012

BIOS Password Recovery methods

Have you lost the password that you have set for your BIOS? Haven't you set any password but your system is asking for password. Well, here our experts are telling 2 methods to recover your BIOS password.


Method 1

Check with the laptop’s user manual if there is a procedure given to remove and replace the CMOS battery. Usually, the CMOS battery is located around the main battery or inside the hard drive or memory compartment. If you can reach it, switch off the laptop, remove the main battery and then remove this CMOS battery. Then wait for around 15 – 20 minutes before putting them all back in place. This should clear out the BIOS password.


Method 2

Download the utility ‘CmosPwd’ from ‘http://www.cgsecurity.org/cmospwd-5.0.zip’ and unzip it to a folder on your desktop. Now similarly, open a command prompt and execute the file you downloaded. Follow the procedure in the window and try if your BIOS password is reset.