Showing posts with label how to. Show all posts

Sunday, November 25, 2012

How to show Hidden files and folders in Windows

How to show Hidden files and folders in Windows 7. Method also works in Windows XP and Vista.

Method 1

Show hidden files and folders using Folder Options.

  1. Click on Start Button. Type "Folder options" and open it. Or you can open windows explorer and click on organize (top left) and click folder options.
  2. A folder options window opens.
  3. Click on the view tab.
  4. Change from "Don't show hidden files" to "Show hidden files".
  5. Click on Apply and OK.


Method 2

Show hidden files and folders using Registry editor.

  1. Open registry editor by clicking Start Button and type "regedit".
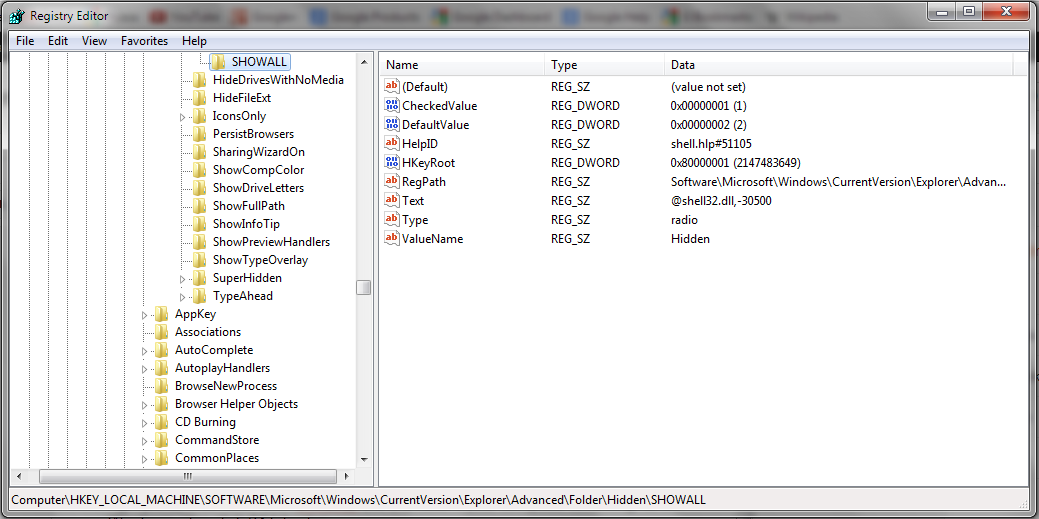
  2. Locate the following registry:Computer\HKEY_LOCAL_MACHINE\Software\Microsoft\Windows\CurrentVersion\Explorer\Advanced\Folder\Hidden\SHOWALL
  3. Click SHOWALL folder in the left pane and check if item CheckedValue is present in the right pane and if the value set to it is 1.
  4. If CheckedValue item is missing in the right pane, then right click in the blank area on the right pane, click New -click DWORD (32 bit) value if your computer is running 32 bit Windows, else click 64 bit value.
  5. Name the item you created as CheckedValue.
  6. Double click on CheckedValue item and type 1 in the value data box and then click ok.
  7. Close the registry editor and restart the computer.
  8. Enable hidden files and folders to see if it works.
[Click to view full size]

Saturday, November 17, 2012

How to recover data from a crashed Windows system


[This article was also posted on our sister website: Tech Authority]

How to recover your data from a crashed Windows 7 computer? (Will work on vista and XP too) 

An easy way to recover data is to install another Operating system so that it can help you to access your hard drive. We'll choose Linux as it is free. 
To install linux on your computer, you'll need a linux distribution (distro). 99% of them are free. Search for list of linux distributions on Wikipedia. You'll find a list of lot of linux based operating systems. livecdlist.com can also help. 
I'll recommend ubuntu, tiny linux, knoppix, fedora, debian, xubuntu, px linux os etc. Download any of 'em and make a bootable usb. Bootable usb can be made using unetbootin, universal usb installer etc. (search for live cd maker). Install this and make a bootable pen-drive (I recommend 4gb). 
Now turn off your computer and restart. As it starts, u'll see boot options (F12 or something else). Press it and u'll see a black window showing boot options. Choose your pen drive to boot and then hit enter. After booting u'll see a menu provided by that linux distro. choose live cd or try.
Then you'll see ur new OS which is running from ur usb. Now u can access ur hard drive. Connect an external/portable hard drive and then copy all of the data. After it, shut down ur computer; all of the data has been backed up. Now go on and format ur hard drive by using windows 7 (or other Windows) installer DVD/ USB.


Tuesday, November 13, 2012

How to root your Android


What is rooting the Android?


Android rooting is the process of allowing users of devices running the Android mobile 
operating system to attain privileged control (known as "root access") within Android's subsystem.Android is based on Linux. 

On Linux and other UNIX-like operating systems, the root user is equivalent to the Administrator user on Windows. The root user has access to the entire operating system and can do anything. By default, you don’t have root access to your Android device, and certain apps won’t function without root access.

With root access, you can disable the bloatware that comes with your phone, manually deny app permissions, run a firewall, access the entire file system, or tether your device, even if tethering functionality has been disabled. You’ll find many apps that require root access in the Google Play store (formerly known as the Android Market), although they won’t function until you root your device.


Warnings

Before you root your Android phone or tablet, there are a few things you should be aware of:

  • Warranty – Some manufacturers assert that rooting voids your device’s warranty. However, rooting will not actually damage your hardware. You can “unroot” your device and manufacturers won’t be able to tell if it’s been rooted.
  • Security – Google Wallet, in particular, has a vulnerability on rooted devices that could allow other apps to access your PIN and other wallet information.  Google Wallet displays a warning message if you run it on a rooted device. If you’re one of the few people using Google Wallet for NFC payments, you may want to reconsider rooting your device.
  • Bricking – Rooting a device is a very safe process. However, there’s always some danger of “bricking” a device when you go outside the normal parameters and hack around with it — particularly if you’re trying to root a device or operating system version not supported by a tool. “Bricking” means to breaking the device, making it about as useful as a brick. When you root, jailbreak, or install a custom ROM, or otherwise hack around, you do so at your own risk. It’s a good idea to do a little bit of research first and see if other people report success rooting your device.

Disclaimer: Rooting your device will void its warranty. In addition, performing the rooting procedure incorrectly may have unexpected consequences. Please follow this guide at your own risk. AddictiveTips will not be liable if your device gets damaged or bricked during the process.

Setup
Here we will use SuperOneClick for root process.
Download here: SuperOneClick
The actual rooting process itself should only take a single click. However, you’ll need to do a few quick things first:
Download and install the Java JDK and Android SDK on your computer before continuing. Java must be installed before the Android SDK.
Enable USB debugging on your Android. On the device, go into the Settings screen, tap Applications, tap Development, and enable the USB debugging check box.
Connect your Android to your computer using its included USB cable. Don’t mount the device’s SD card on your computer – just plug it in.
You’ll also need the USB drivers for your phone or tablet installed. SuperOneClick itself should be able to automatically install the appropriate drivers – however, if this fails, you’ll need to download and install the appropriate drivers from the device manufacturer’s website.
Start here
1. Now you have downloaded and installed SuperOneClick. Open it.

2. Click the Root button in the SuperOneClick window and SuperOneClick should do the rest.


3. The process will take a few minutes. If you run into a problem, you might want to check the XDA Developers forum for your device or do a Google search. 


Once you have completed above process, restart your device after rooting it. You will see the Super User Icon and it means that you have successfully rooted your phone. Keep in mind that on using this method to root Android device will also help you to unroot it, but you can't root it again.


Rooted Android Screen


Super User logo


So, the above GUI based method was pretty simple. Here's another method which is console based and bit typical.


[Courtesy: How to Geek]

How to Save Email attachments to Google Drive


Now you do not need to worry about your email attachments if your system gets crashed. Because a Google Chrome extension "Attachments.me" helps you to save it to your Google Drive directly. The most cool thing is that it works automatically, so there's no need to manually move every attachment there. 

It is easy to set up the app. When you're done, the attachments from the upcoming E-mails will move to your Google Drive. Keep in mind that it will also fill your Google Drive storage. 

Download app here


Do you like it? Put your views in comments. 


Screenshots


Monday, November 12, 2012

BIOS Password Recovery methods

Have you lost the password that you have set for your BIOS? Haven't you set any password but your system is asking for password. Well, here our experts are telling 2 methods to recover your BIOS password.


Method 1

Check with the laptop’s user manual if there is a procedure given to remove and replace the CMOS battery. Usually, the CMOS battery is located around the main battery or inside the hard drive or memory compartment. If you can reach it, switch off the laptop, remove the main battery and then remove this CMOS battery. Then wait for around 15 – 20 minutes before putting them all back in place. This should clear out the BIOS password.


Method 2

Download the utility ‘CmosPwd’ from ‘http://www.cgsecurity.org/cmospwd-5.0.zip’ and unzip it to a folder on your desktop. Now similarly, open a command prompt and execute the file you downloaded. Follow the procedure in the window and try if your BIOS password is reset.


Get back your Start Menu in Windows 8 with Start8


Are you missing the Start Menu in Windows 8? Same here, we too. 

As you know that Microsoft has dropped the Start Menu in Windows 8 to make an OS that will have same look and feel on both computers and touchscreen systems. This information was released a time ago this year. 

Start Menu in Windows 8 provides functionality and ease of access. On hitting, it will take you to the list of pinned apps on Start Screen. Although it is useful, but most of us are missing the old conventional Start Menu, because you know it can display all programs, and frankly speaking, its easier to use than Start Screen. 

Those of you who'd want the old menu back, here's an option to recover it. Start8 gives you an option to add Start Menu.

The program has only recently moved to a stable development build, but it started making waves online since it was in beta. Stardock’s Start8 is not free and the price tag indicates a $4.99 fee. You can try it for 30 days with all features enabled. ObjectDock, another product from Startdock has all features of Start8, but also has few more options such as 

It's easy to install the utility. It has simple and clean user interface and can be easily operated. Before you jump to reboot the system, you can customize its looks and set the permanent shortcuts you want in the right hand side of the Start menu. Also configurable are the actions available for the classic environment, as well as for Modern UI.


Download Start8
Screen shots

 1. Start8 About Window. 


2. You can choose between Windows 7 and Windows 8 styles. 


3. Windows 7 styled Start Menu.

4. Windows 7 styled All programs menu (It is not detailed because we don't have lot of programs installed).


5. Windows 8 styled Start Menu.


6. Start8 app in Start Screen.

Saturday, November 10, 2012

How to customize Windows Start Menu


Are you got bored with the traditional Windows Start Menu? Well, here's a way to customize it.

The shareware tool Start Menu 7 offers a good alternative to the standard start menu; this can be downloaded from startmenu7.com.

According to the developers, Start Menu 7 runs on both XP and Vista in addition to Windows 7 as its name suggests. For installation, double-click on the downloaded file in Windows Explorer and follow the instructions given by the setup wizard.

You must have a user account with administrator rights during the process as the setup routine involves accessing important system files. Once the installation is complete start the Program using the command ‘Start> All programs> Start Menu 7> Start Menu 7’. Now, when you click on ‘Start’ you will not see the usual start menu provided by Windows, but instead, a menu that has an extensive collection of links: It has a different visual effect and enables direct access to all the programs and files on your system in an alphabetically sorted sub-menu format, for instance ‘Programs’, ‘My Documents’ or ‘Computer’. In addition to this, the various entries use additional sorting and display tools.


Thus, for instance ‘Program’ offers the structure known as ‘All programs’ as seen in the usual Windows Start menu and on the other hand, the ‘Program’ links can be found under headings such as ‘Quick start’ and ‘Autorun’. 

You can add your own menus and commands using the option ‘Add entries to the menu’. Click on ‘Options’ and ‘Configuration’ so as to complete the experience as per your own taste. Use the option ‘System integration’ and remove the tick in front of ‘Start the Start Menu 7 with Windows’ if you do not wish to activate the tool automatically at every system start. 

You can add more power management buttons in Start Menu 7 using the option ‘Buttons’; this is done to turn off the computer, to restart it, or to enable the use of power management commands in a time-controlled fashion. For this, click on the corresponding button in the Start menu, select the desired function in a menu, for instance ‘Turn off the computer’, and define the period for action in a simple and an intuitive dialog. Finally, click the ‘Start’ button to save the settings.


Friday, November 9, 2012

Save large websites as PDF and read offline


You visit websites. You like them. You read articles on web. You want to read them later. But how to do so?

The browsers that we use provide us the way to view HTML pages in an ordered look. But when we save them and open them to read again offline, they need an internet connection otherwise content gets disordered. So here’s the option to save webpages as PDF without losing the quality. This service is provided by pdfcrowd.com.

Launch the website. Enter your desired URL in the ‘address’ field of the ‘Convert webpage tab’. Click on ‘Convert to PDF’. It will convert the webpage to PDF and will let you download the PDF. However, it will not work when the required webpage requires you to register.

But still you have a great functionality to save your favorite webpages as PDF to your hard disk. What’s the icing on the cake is, you can upload it to Dropbox, Google Drive etc. and also read it on your Smartphones and tablets.